Libraries tagged by Credit purchase
hillelcoren/invoice-ninja
107 Downloads
Invoices, expenses & time-tracking built with Laravel
inda-hr/php_sdk
255 Downloads
# Introduction **INDA (INtelligent Data Analysis)** is an [Intervieweb](https://www.intervieweb.it/hrm/) AI solution provided as a RESTful API. The INDA pricing model is *credits-based*, which means that a certain number of credits is associated to each API request. Hence, users have to purchase a certain amount of credits (established according to their needs) which will be reduced at each API call. INDA accepts and processes a user's request only if their credits quota is grater than - or, at least, equal to - the number of credits required by that request. To obtain further details on the pricing, please visit our [site](https://inda.ai) or contact us. INDA HR embraces a wide range of functionalities to manage the main elements of a recruitment process: + [**candidate**](https://api.inda.ai/hr/docs/v2/#tag/Resume-Management) (hereafter also referred to as **resume** or **applicant**), or rather a person looking for a job; + [**job advertisement**](https://api.inda.ai/hr/docs/v2/#tag/JobAd-Management) (hereafter also referred to as **job ad**), which is a document that collects all the main information and details about a job vacancy; + [**application**](https://api.inda.ai/hr/docs/v2/#tag/Application-Management), that binds candidates to job ads; it is generated whenever a candidate applies for a job. Each of them has a specific set of methods that grants users the ability to create, read, update and delete the relative documents, plus some special features based on AI approaches (such as *document parsing* or *semantic search*). They can be explored in their respective sections. Data about the listed document types can be enriched by connecting them to other INDA supported entities, such as [**companies**](https://api.inda.ai/hr/docs/v2/#tag/Company-Management) and [**universities**](https://api.inda.ai/hr/docs/v2/#tag/Universities), so that recruiters may get a better and more detailed idea on the candidates' experiences and acquired skills. All the functionalities mentioned above are meant to help recruiters during the talent acquisition process, by exploiting the power of AI systems. Among the advantages a recruiter has by using this kind of systems, tackling the bias problem is surely one of the most relevant. Bias in recruitment is a serious issue that affect both recruiters and candidates, since it may cause wrong hiring decisions. As we care a lot about this problem, we are constantly working on reduce the bias in original data so that INDA results may be as fair as possible. As of now, in order to tackle the bias issue, INDA automatically ignores specific fields (such as name, gender, age and nationality) during the initial processing of each candidate data. Furthermore, we decided to let users collect data of various types, including personal or sensitive details, but we do not allow their usage if it is different from statistical purposes; our aim is to discourage recruiters from focusing on candidates' personal information, and to put their attention on the candidate's skills and abilities. We want to help recruiters to prevent any kind of bias while searching for the most valuable candidates they really need. The following documentation is addressed both to developers, in order to provide all technical details for INDA integration, and to managers, to guide them in the exploration of the implementation possibilities. The host of the API is [https://api.inda.ai/hr/v2/](https://api.inda.ai/hr/v2/). We recommend to check the API version and build (displayed near the documentation title). You can contact us at [email protected] in case of problems, suggestions, or particular needs. The search panel on the left can be used to navigate through the documentation and provides an overview of the API structure. On the right, you can find (*i*) the url of the method, (*ii*) an example of request body (if present), and (*iii*) an example of response for each response code. Finally, in the central section of each API method, you can find (*i*) a general description of the purpose of the method, (*ii*) details on parameters and request body schema (if present), and (*iii*) details on response schema, error models, and error codes.
ageekdev/geek-credit
169 Downloads
To simplify credit management and in-app purchases in Laravel apps.
amwal/payments
908 Downloads
Amwal payment plugin for Magento 2 enables one click checkout for instantaneous purchases from product, mini-cart and cart pages.
briqpay/php-sdk
8775 Downloads
This is the API documentation for Briqpay. You can find out more about us and our offering at our website [https://briqpay.com](https://briqpay.com) In order to get credentials to the playgrund API Please register at [https://app.briqpay.com](https://app.briqpay.com) # Introduction Briqpay Checkout is an inline checkout solution for your b2b ecommerce. Briqpay Checkout gives you the flexibility of controlling your payment methods and credit rules while optimizing the UX for your customers # SDKs Briqpay offers standard SDKs to PHP and .NET based on these swagger definitions. You can download them respively or use our swagger defintitions to codegen your own versions. #### For .NET `` Install-Package Briqpay `` #### For PHP `` composer require briqpay/php-sdk `` # Standard use-case As a first step of integration you will need to create a checkout session. \n\nIn this session you provide Briqpay with the basic information necessary. In the response from briqpay you will recieve a htmlsnippet that is to be inserted into your frontend. The snippet provided by briqpay will render an iframe where the user will complete the purchase. Once completed, briqpay will redirect the customer to a confirmation page that you have defined. 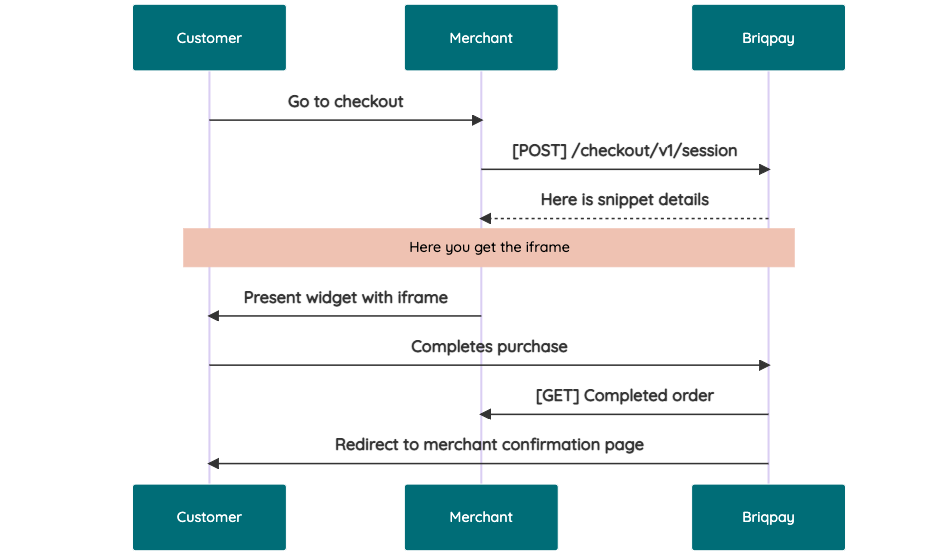 # JavaScript SDK The first step of integration is to add our JS to your site just before closing the ```` tag. This ensures that our JS library is avaliable to load the checkout. ```` Briqpay offers a few methods avaliable through our Javascript SDK. The library is added by our iframe and is avalable on ``window._briqpay`` If you offer the posibility to update the cart or order amonts on the checkout page, the JS library will help you. If your store charges the customer different costs and fees depening on their shipping location, you can listen to the ``addressupdate``event in order to re-calculate the total cost. ```javascript window._briqpay.subscribe('addressupdate', function (data) { console.log(data) }) ``` If your frontend needs to perform an action whe the signup has completed, listen to the ``signup_finalized`` event. ```javascript window._briqpay.subscribe('signup_finalized', function (status) { // redirect or handle status 'success' / 'failure' }) ``` If you allow customers to change the total cart value, you can utilise the JS library to suspend the iframe while you perform a backen update call towards our services. As described below: 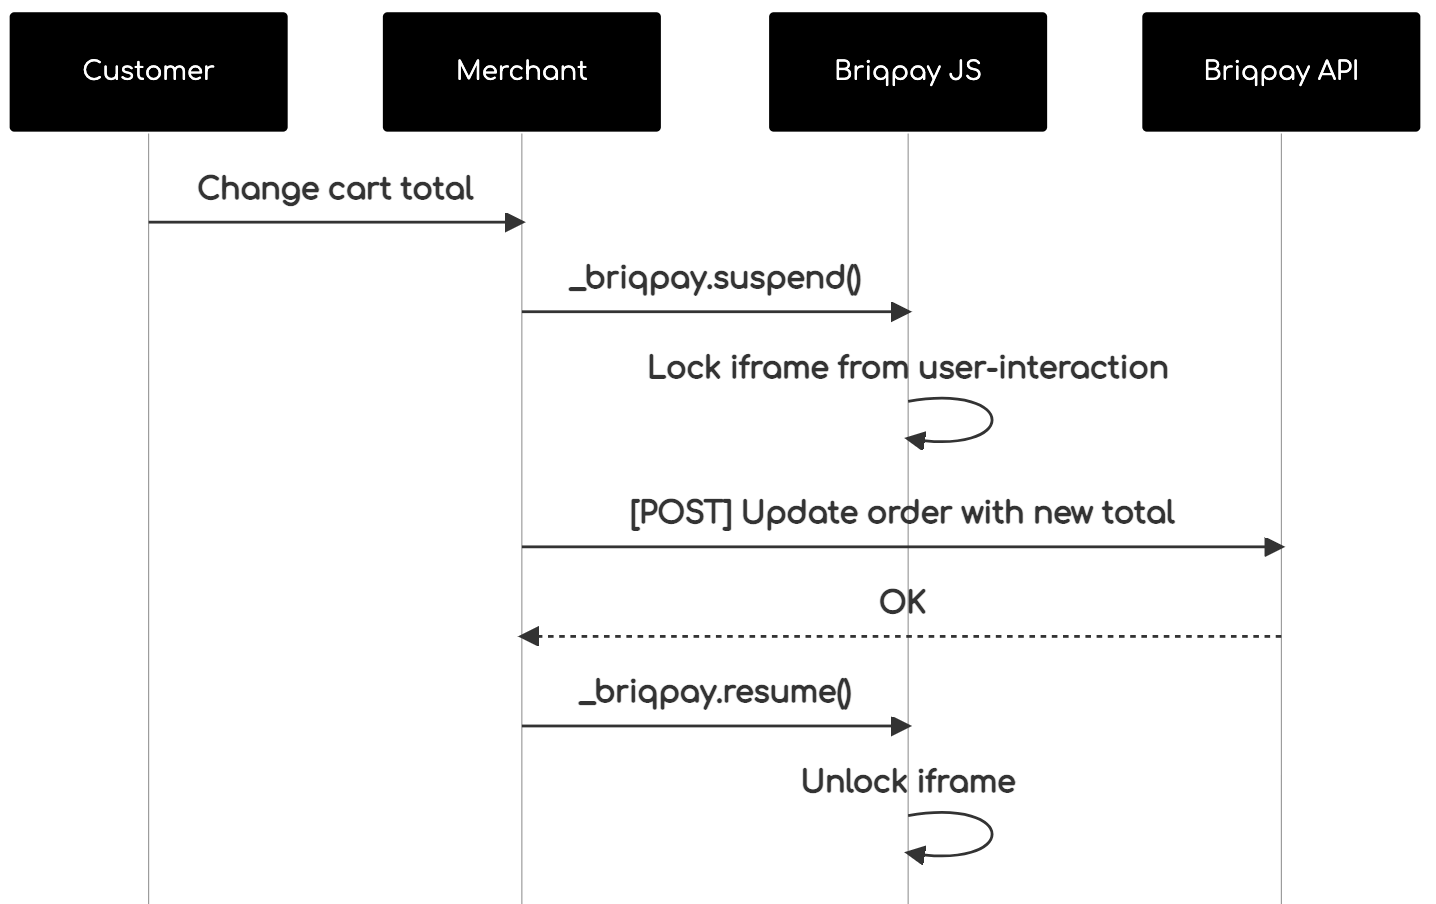 The iframe will auto-resume after 7 seconds if you dont call ``_briqpay.resume()`` before # Test Data In order to verify your integration you will neeed to use test data towards our credit engine. ## Company identication numbers * 1111111111 - To recieve a high credit scoring company ( 100 in rating) * 2222222222 - To test the enviournment with a bad credit scoring company (10 in rating) ## Card details In our playground setup your account is by default setup with a Stripe integration. In order to test out the card form you can use the below card numbers: * 4000002500003155 - To mock 3ds authentication window * 4000000000000069 Charge is declined with an expired_card code. You can use any valid expiry and CVC code # Authentication Briqpay utilizes JWT in order to authenticate calls to our platform. Authentication tokens expire after 48 hours, and at that point you can generate a new token for the given resource using the ``/auth`` endpoint. - Basic Auth - only used on the auth endpoint in order to get the Bearer Token - JWT Bearer Token - All calls towards the API utlizes this method"
mage2pro/moip
509 Downloads
Moip integration with Magento 2
c975l/purchasecredits-bundle
98 Downloads
Bundle to purchase and use credits within a website
xepan/omnipay-instamojo
1167 Downloads
Instamojo API v1.1 driver for the Omnipay PHP payment processing library: credit : gentor/omnipay-instamojo